API testing with JMeter

JMeter is a simple tool for automated API testing.
Advantages
- Fast API testing
- Perform scope tests quickly
- Supports load testing
- Supports stress testing
- Generates test data
- Open source tool
- Lots of plugins and extensions
- Cross-platform
- Ability to use various programming languages (Java/JS/PHP)
Disadvantages
- Uses a lot of system resources
- Not useful for a large number of requests (more than 10,000)
- Limited quantity of the testing results in tables and graphics
Below, we describe several important use cases for JMeter based on our experience.
Important use cases for JMeter
1. Tokens and special keys for a site
More than 98% of websites with basic authorization have special keys or tokens that provide access to content and functionality and perform certain actions. But before you see an app, a QA team will have tested it a lot of times. We can use Apache JMeter to test more productively and save time. There are two ways to do this:
1.1 Write a small JS script to get a token or key from the request
(“var json = JSON.parse(prev.getResponseDataAsString());
vars.put('TOKEN', json.user.accessToken);”)
1.2 Use the Regular Expression Extractor: ( "key":\s*"([^"]+)"?)

Image 1 – Regular Expression Extractor in JMeter
Here are what the numbers in Image 1 stand for:
- Name of the variable which we will use in the future requests
- Regular expressions that will take a key or token from the response
- Template (we always use $1$)
These two methods are essentially the same, but the second is a little faster.
You can invoke the value, namely a key or token that we have taken from response (in our case, it's key) in two main ways:
- as a variable
- in a URL
To check whether a token has been successfully imported into Apache JMeter, use the Debug Sampler with the results tree (first, you need to add this Results tree to the test and after that click on Results tree and find Debug sampler).
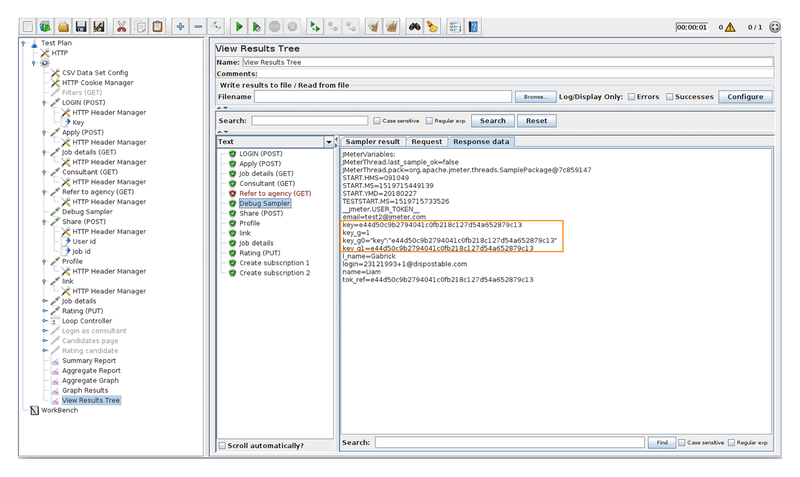
Image 2 – Debug Sampler example
With variables, we can use ID keys to know exactly which parameter we need and where it must be used. To make these ID keys work, add the following to a variable’s ID:
${key} -> 285e0d82bc1632d8b349e270a14dd7442c28fcb2
${key_g0} -> "key":"285e0d82bc1632d8b349e270a14dd7442c28fcb2"
${key_g1} -> 285e0d82bc1632d8b349e270a14dd7442c28fcb2
2. Functions and variables
To send requests to the server with parameters, add functions and variables as well as a browser. What we do is we simulate how a real browser works without it, and the server answers like a browser would. The server should receive requests with information, and each request depends on the data we send to it. We need to send different parameters to the server in order to receive different answers.
- We can use variables such as the values in the Parameters tab

Image 3 – Values in the Parameters tab
A popular method among QA engineers is adding parameters in the Parameters tab, but we can’t use parameters in other programs.
- In the Body Data tab in the HTTP Request (see Image 4 below), we add information in JSON format. This option is more comfortable when you export tests or when a request to the server includes sub-requests.
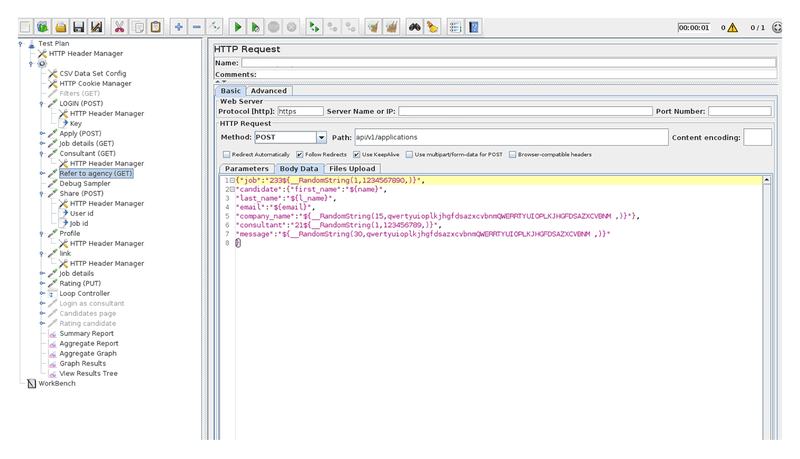
Image 4 – Example of values in Body Data
When you use information in JSON format, it’s easy to use these parameters in other programs such as Postman, Fiddler, or Charles or to use them when you write a framework, but if you miss some bracket, period, or comma all tests will fail.
3. Multi-part forms
This is a composite content type most commonly used to send HTML forms. Multi-part forms are used in chats, profiles, and so on.
To send a multi-part form, remove all Content-Type values from the HTTP Header Manager (not only for a request but for the whole thread) and also add the information that you want to send.
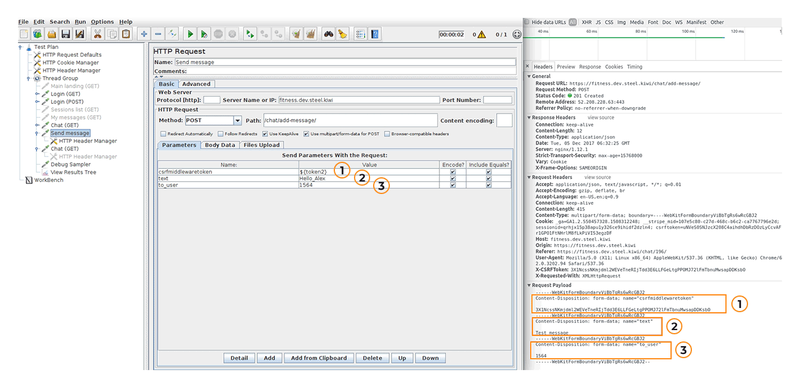
Image 5 – Sample of a multi-part form in an HTTP request
The Use multipart/form data for POST checkbox may be unchecked.
4. How can you verify that a request is successful
Response Assertion is a great function for verifying the response status of a server. You can add it by right-clicking on Request –> Add –> Assertions –> ResponseAssertion and entering the expected status code. When you run your test, the server will return the status code and JMeter will compare it with the value in the response assertion and show whether you’ve passed your test.

Image 6 – Response assertion example
5. Small tips
5.1 Counter and loop sampler
In some cases, we need to send the same request several times. We can use the loop sampler plus counter for this. This counter shows a number for every request that we send. We use the loop sampler for filters, chats, and so on. With the loop sampler, we can simulate communication between two or more users without involving actual people! To add the loop controller, right-click on Thread –> Add –> Logic controller –> Loop controller and add a request to the loop controller.
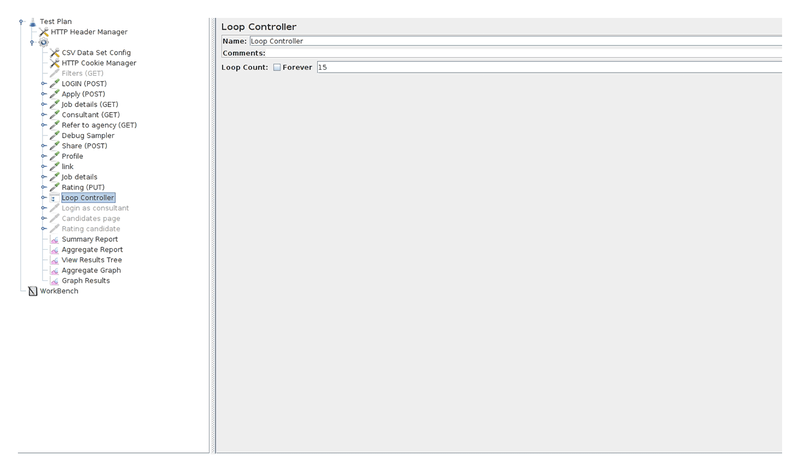
Image 7 – Example of loop controller
Here, we can set the number of loops or set looping to infinite by clicking the Forever checkbox.
When you use the loop controller with a large value, we recommend using counters, as they simplify testing. Counters allow you to easily determine in which query specific data is transmitted without counting manually, thereby saving time.
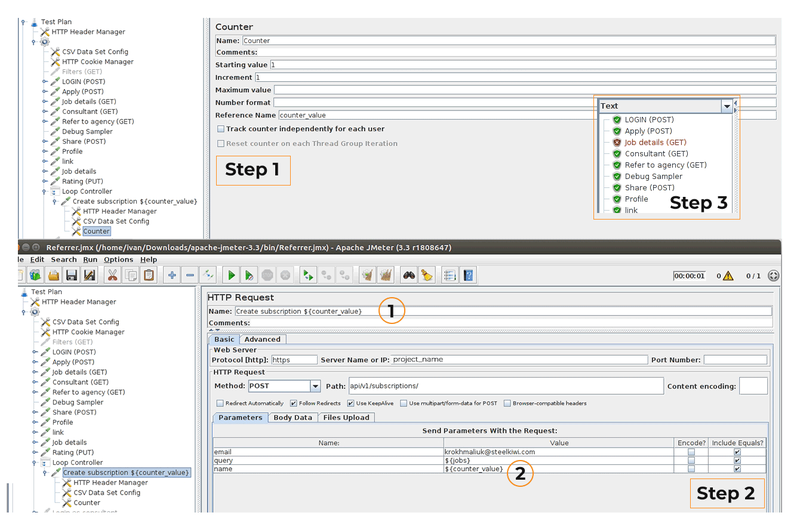
Image 8 – Counter example
To add a counter, right-click on Thread –> Add –> Config element –> Counter and add a counter to your request.
In the first step, you need to specify the starting value/increment and the value name. After that, add this parameter (a counter value that we entered in Step 1 at the Reference name field) to the request name (see Image 8 where the field is marked by #1) and to the parameters body (field in Image 8 marked by #2). After doing this, run the test and see the results in the results tree.
5.2 Random variables
Sending a request to the server via Jmeter without changing it isn’t useful. We all know the testing principle called the pesticide paradox, which explains why we should use different values. There are two simple ways to achieve the desired result.
One way is to use a random string generated in the Function Helper window (Options drop-down or Ctrl+Shift+F1).
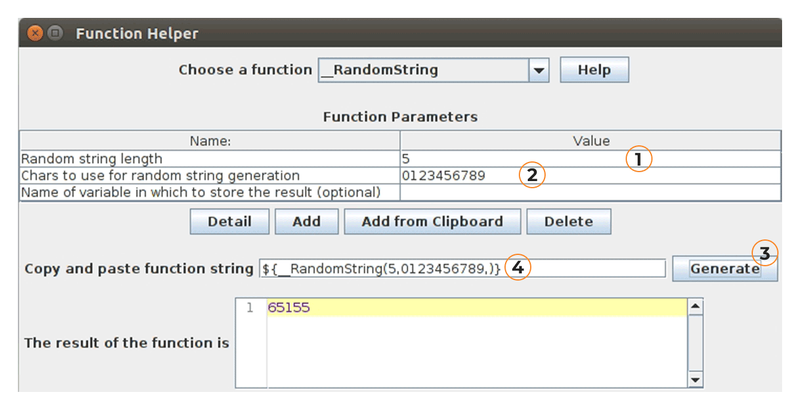
Image 9 – Function Helper window
Here is what numbers in Image 9 stand for:
- Length of the value
- Characters that will be used
- Generate string function button
- Functional string
The random numbers string can be used not only for numbers but also for alphabetic values. You can generate a random string entering letters(and remember that a space is a character too).
Another option would be to use CSV Data Set Config by adding this element to the Test Plan and configuring it.
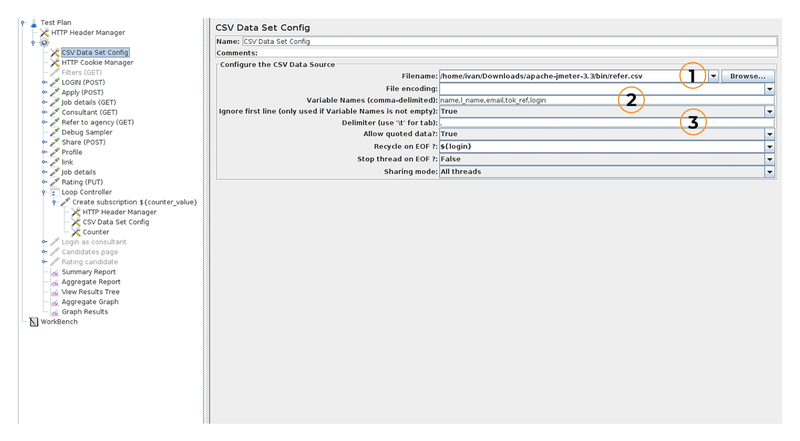
Image 10 – Example of CSV Data Set Config
Here is what numbers in Image 10 stand for:
- Path to the CSV file with information
- Names of variables to send to the server
- Delimiter
After we add the CSV data set config, we need to specify parameters in the query itself that will be sent to the server from the file. After that, we can run our test and the data from the file will be taken sequentially with each subsequent request and sent to the server. JMeter will start by taking the first value from the CSV file and sending it to the server.
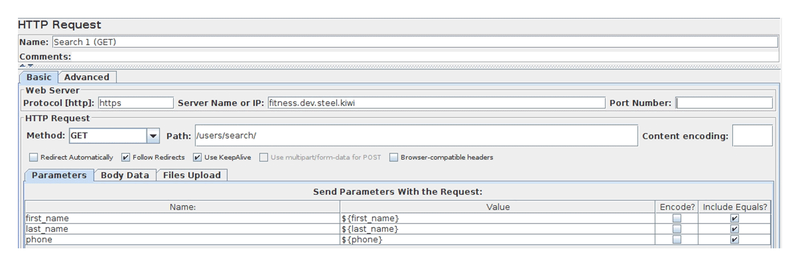
Image 11 – HTTP request with CSV parameters
JMeter is a powerful instrument for selecting the exact value for search, filter, and other parameters.
5.3 Timers
We can use timers and delays to get close to real load conditions with actual users on the server.
The easiest way to do this is to set values in the thread, but the drawback of this solution is that we don’t know what the exact delay time and the interval between requests should be.
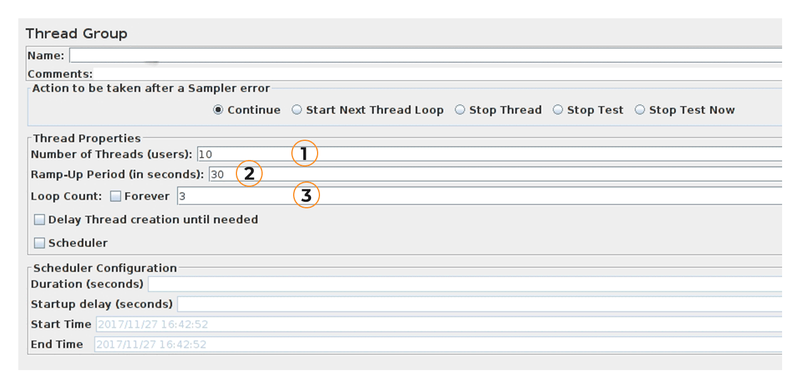
Image 12 – Simple timer in the Thread Group
Here is what numbers in Image 12 stand for:
- Number of users who will use the resource
- Time that each user will spend in the resource
- Number of iterations
If you need a constant timer, however, you need to use Constant Timer. You can add it to your request by right-clicking Add –> Timers –> Constant Timer and setting the delay time in milliseconds, or you can add it in the Thread Group and this delay will apply to all requests in the thread.
The Uniform Random Timer is used for a random delay between requests. We can select a range for delay times (constant and maximum values), and JMeter will select random times from within this range and apply them to requests.

Image 13 – Uniform Random Timer example
Conclusion
JMeter is a powerful testing tool. It’s flexible, and you can configure it yourself to fit your unique project goals. Plus, don’t forget that JMeter is open source and has a lot of extensions that can help you work with it.
The standard set of graphs and tables in JMeter is small, but you can connect charts and graphs through Blazemeter or use any other extensions you like.
Useful links
- Apache JMeter technical documentation.
- Apache JMeter from the "JMeter Cookbook” by Bayo Erinle.