SwiftUI vs UIKit: Benefits and drawbacks

Much noise was made about the release of SwiftUI, as it promises to be an innovative framework that will supersede UIKit due to its simplicity and speed of coding.
SwiftUI is a completely new framework that allows you to design and develop user interfaces declaratively and with less code. Unlike UIKit, which is commonly used in conjunction with storyboards, SwiftUI is completely software-based. However, SwiftUI syntax is very easy to understand, and a SwiftUI project can be quickly viewed using Automatic Preview.
SwiftUI was created for cross-platform use to build applications with less code than UIKit but with the same complexity.
Drawbacks of SwiftUI
Let’s start with the drawbacks of SwiftUI:
- It supports only iOS 13 and Xcode 11. By switching to them, you abandon users of older versions of iOS, which is a radical move devoid of concern for the user. But since Apple annually updates its list of supported iOS versions, we think SwiftUI will be used more over the next two years as users install the latest iOS version.
- It’s still very young, so there isn’t much data on Stack Overflow. This means that you can’t get much help resolving complicated issues.
- It doesn’t allow you to examine the view hierarchy in Xcode Previews.
SwiftUI benefits
Now let’s talk about the benefits of SwiftUI, which exceed the cons in number:
- It’s easy to learn, and the code is simple and clean.
- It can be mixed with UIKit using UIHostingController.
- It allows you to easily manage themes. Developers can easily add dark mode to their apps and set it as the default theme, and users can easily enable dark mode. Besides, it looks awesome.
- SwiftUI provides mechanisms for reactive programming enthusiasts with BindableObject, ObjectBinding, and the whole Combine framework.
- It offers Live Preview. This is a very convenient and progressive way to see the results of code execution in real time without having to build. We are not sure if it somehow affects the processor. So far, we’ve noticed a delay provoked by the use of Live Preview, but we think Apple will soon make improvements.
- SwiftUI no longer needs Interface Builder. It was replaced by Canvas, an interactive interface editor. When writing code, the visual part in Canvas is automatically generated, and when you create visual presentation elements, they automatically appear in the code.
- Your application will no longer crash if you forget to update the @IBOutlet association with the variable.
- There’s no AutoLayout or related problems. Instead, you use things like HStack, VStack, ZStack, Groups, Lists, and more. Unlike AutoLayout, SwiftUI always produces a valid layout. There’s no such thing as an ambiguous or unsatisfiable layout. SwiftUI replaces storyboards with code, making it easy to create a reusable view and avoid conflicts related with the simultaneous use of one project by the development team.
UIKit vs SwiftUI: Real-world examples
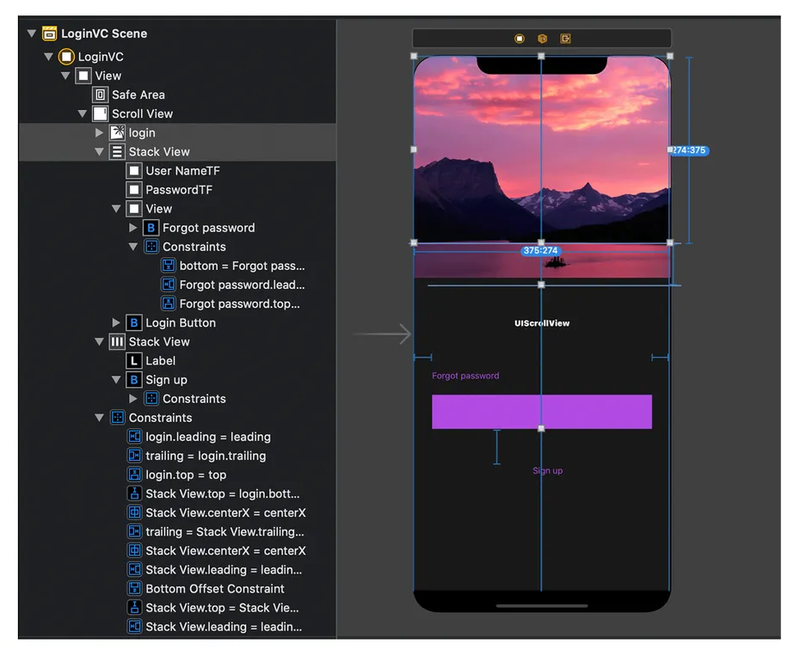
Now we’ll show you a login screen layout made using UIKit and compare it to the equivalent layout in SwiftUI. The layout and functionality are taken from a real project. Our end result will look like this:

Developing with UIKit
First, let’s look at the login screen written using UIKit. The project code is grouped in logical chunks. In the ViewController, we declare all needed outlets and variables.

StoryboardInstatiatable is a protocol for initializing and binding the view controller to the storyboard.
BaseVC is a subclass from which we inherit all classes in the project. It contains the most common functions and initializers that we know for sure will be used throughout the project.
PlaceholderTF is a subclass that contains all the universal manipulations with text fields throughout the project.
Below are functions and actions that contain all the events associated with user interface controls: buttons, text fields, etc.
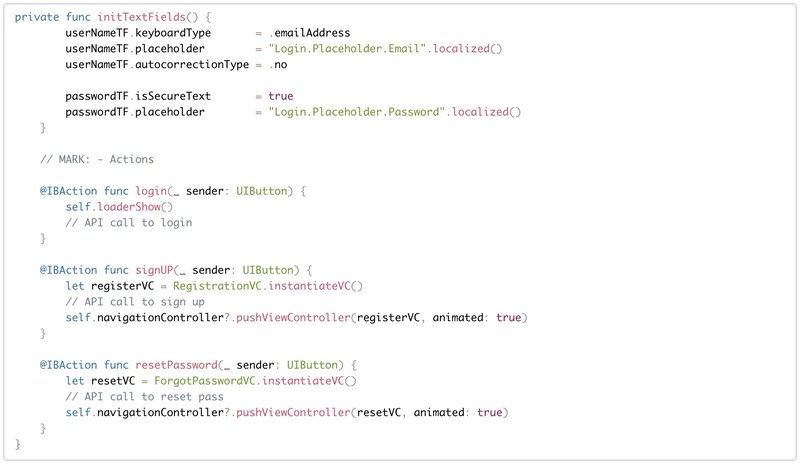
We also used the SKLocalizable extension for localization, which you can find at the link.
In this project, we actively used AutoLayout. It’s impossible to do without it when using UIKit. We set the font, text color, background color, image view picture destination, content mode, and all related constraints and positions in the storyboard. There are two approaches: you can either do all these things in the storyboard or programmatically.
What’s different with SwiftUI?
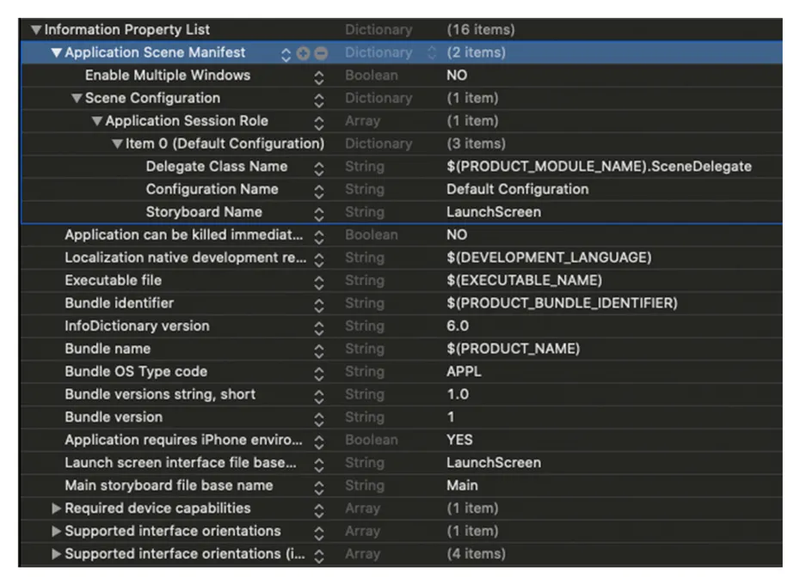
Let’s look at the SwiftUI version. The very first differences are in Info.plist.
Functionality that used to be performed exclusively by AppDelegate is now performed by SceneDelegate. The app now can have one scene or more, and the scene serves as a foreground for the app’s user interfaces and content.
SceneDelegate includes lifecycle events such as active, resign, and disconnect.
The AppDelegate class now contains two new functions, called application(_:configurationForConnecting:options:) and application(_:didDiscardSceneSessions:).
The Info.plist property list gets an Application Scene Manifest, which has to contain the enumeration of scenes, their classes, delegates, and storyboards names.
We created an example login page in an existing project to show that this does not conflict with existing code written with UiKit.
The main login view looks like this:
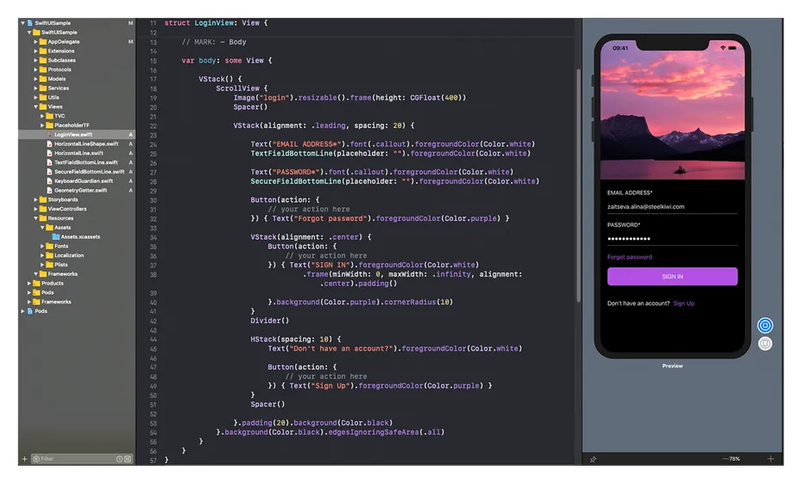
What are the differences between View (in SwiftUI) and UIView (in UIKit)? The first difference is that LoginView is a struct that accepts the View protocol. Also, there are no viewDidLoad or viewDidAppear methods in SwiftUI. The basis of the screens is not the UIViewController, but the View.
To make code work, you just need to describe the body variable, to which you should return the View. The body is your container to which you add all other subviews. In the body, you have to return only one element: Text, Image, Button, etc. — anything that supports the View protocol. Otherwise, the compiler will throw an error.
It’s easy to create elements. You need to write each View from a new line and add function modifiers after the period. You can create a whole chain of modifiers after declaring the View.
In SwiftUI, there are convenient alterations of StackView: VStack (elements arranged vertically), HStack (elements arranged horizontally), and ZStack (elements arranged on top of each other).
Naturally, basic things like UIScrollView and UITableView are also available, but now they’re called ScrollView and ListView.
You can embed one container into another as many times as you need because SwiftUI is optimized for this purpose. And embedding does not affect performance.
Let’s have a quick look at the code and its specifics:
The whole layout is built in VStack. The content of the stack is embedded in ScrollView, where elements are located line by line.
Spacer is another convenient feature that automatically calculates the necessary additional space and adds it.
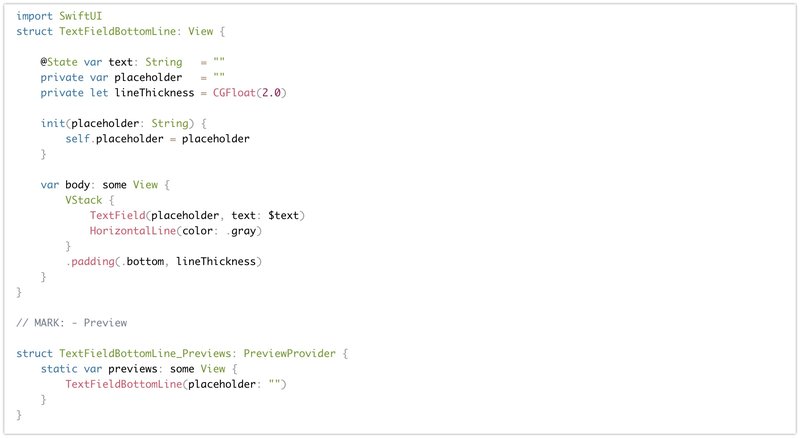
TextFieldBottomLine is a subclass of TextField. Since the design required a TextField with a separator line at the bottom, we created a subclass and redefined the SwiftUI TextField.
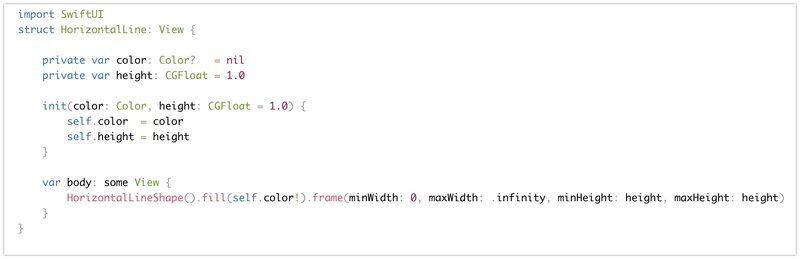
HorizontalLine is a separate view for line drawing.
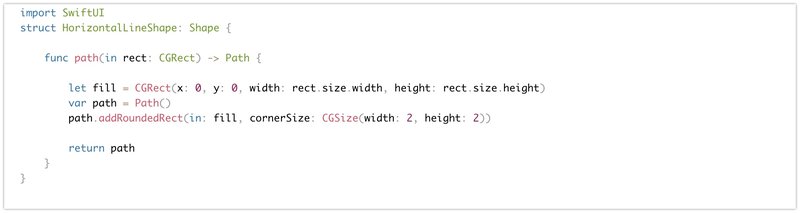
HorizontalLineShape is a struct CGPath analog for drawing the form.
To sum up, SwiftUI has a completely different approach than UIKit to writing code. It’s up to you to choose it. But the fact remains that SwiftUI is clear, easy to read, and convenient to use. You can check it out for yourself.
Even if you’re still a passionate supporter of UIKit, you can safely add functionality from SwiftUI to your UIKit projects. We hope this article has been useful and has answered the most common SwiftUI- and UIKit-related questions.