Smarter prototyping: Reducing costs and increasing efficiency with variables

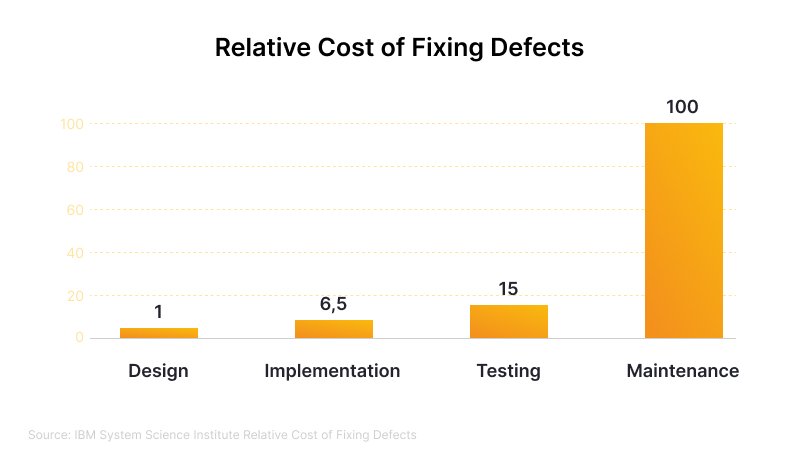
This approach helps optimize costs, as multiple studies confirm that the later a change is made in the development process, the more expensive it becomes. According to the Integrating Software Assurance into the Software Development Life Cycle article, fixing a defect during the testing phase costs 15 times more than addressing it during the design phase, and twice as much as during the development phase. The study was conducted to evaluate the relative costs of fixing defects at different stages of the software development life cycle (SDLC).
Since fixing bugs at later stages is costly, our design department began using tools that allow Globaldev clients to align solutions during the design phase. One such tool is variables in Figma. They enable the creation of interactive prototypes without coding, allowing for feedback before development starts, avoiding costly fixes at later stages, and facilitating communication within the team.
In this article, we will share how the use of variables in Figma helps create realistic prototypes and enhances client interaction, optimizing the development process.
Before and after: How using variables transformed our prototyping approach
Last year, Figma introduced variables that opened new possibilities for the entire development team. Variables can store numbers, text, colors, or boolean values, and allow for conditional logic, making the prototype more realistic and improving its perception. Before a single line of code is written, engineers can grasp how features should behave. Meanwhile, logical flows become easier to validate from a business perspective. Ultimately, variables bring everyone on the same page before development starts.
Previously, creating a prototype required many screens and complex interactions, complicating testing and interaction with the client.
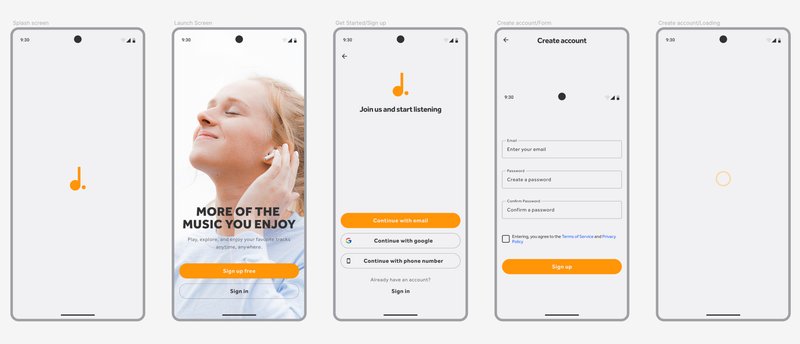
For example, in preparing a prototype without variables for the login flow, the team needed 19 screens and 18 interactions. Each text field in the form adds 4 separate screens to show all states (empty field, focus, error, entered data, etc.).

Now, thanks to variables, our designers have reduced this process to just 5 frames. All the states of the fields and conditions for the login button are handled within a single screen, eliminating unnecessary duplications.
The use of variables in prototyping has significantly optimized the product creation process, making it more flexible, faster, and efficient. Thanks to variables, our designers have fundamentally changed their approach:
Without variables:
- Number of screens: Each state required a separate screen to be created.
- Complicated interactions: Displaying the user flow meant setting up a tangle of connections between frames.
- Involving developers: Realistic interactions required developer involvement and additional code.
With the implementation of variables:
- Minimization of screens: One screen can contain multiple states/types of content that change dynamically.
- Realistic interaction: The prototype behaves almost like a final product.
- Time savings: The team tests the prototype before development, reducing the number of revisions.
- Better communication: Thanks to a realistic prototype, the client understands how everything works before development begins, allowing all participants to be on the same page and reducing the risk of misunderstandings.
- Higher confidence in the final decision and client satisfaction: After demonstrating the prototype, the client stopped making unnecessary revisions as they could see the product works exactly as expected.
How the Globaldev design team uses variables in prototypes
Step 1: We create components
- We identify which UI elements should change in the prototype based on user actions.
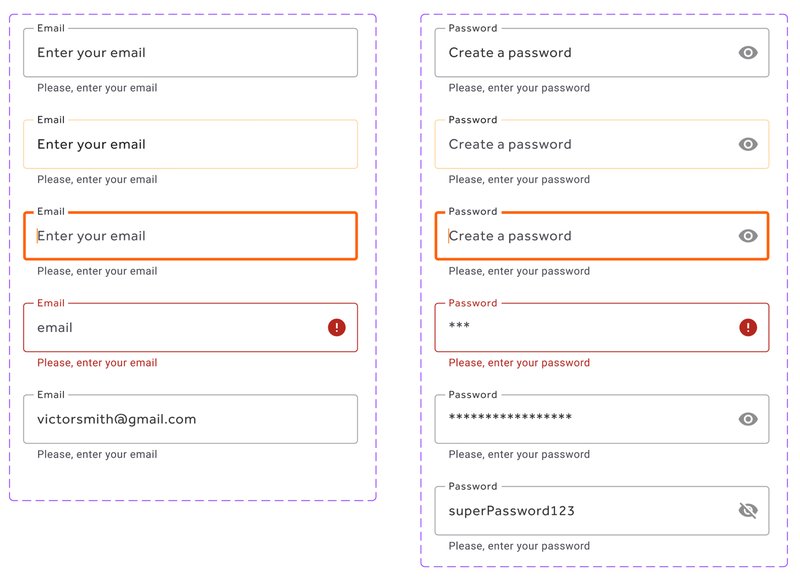
- We create component elements with different states (for example, in this case, text fields with default, error, and filled states) to reflect all possible interactions.
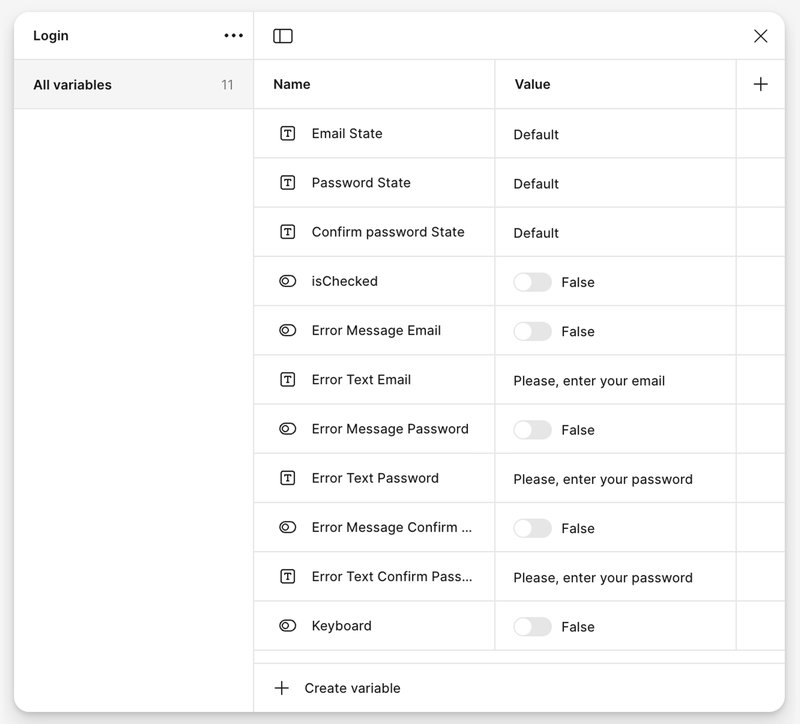
Step 2: We create variables and set values
To make the prototype more realistic, we create variables that store information about element states and content or control their visibility. The design team also sets initial values that change during interaction.
In this case, we create variables that:
- Show the correct state of the text field (e.g., filled or incorrectly filled).
- Control the visibility and text of error messages.
- Verify whether the user has accepted the terms of service.
Step 3: We bind variables to elements
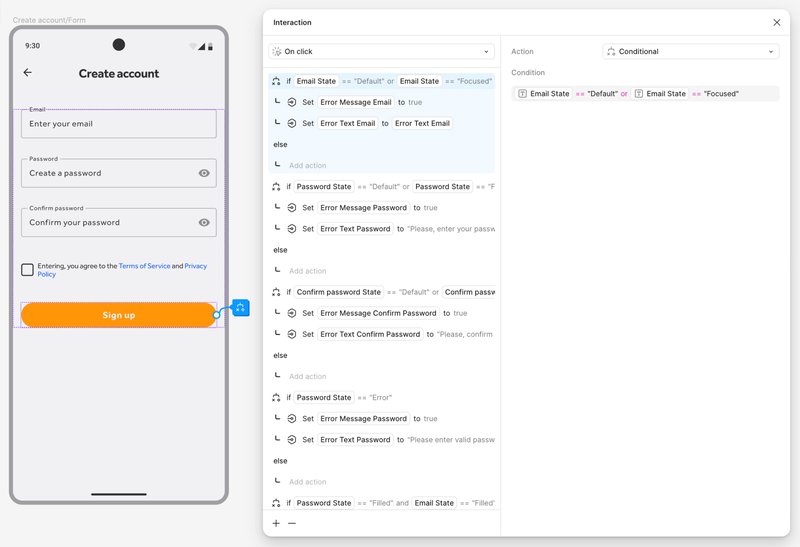
The Globaldev design team links variables to elements to enable real-time changes during interaction. For instance, we select the Email field, navigate to the toolbar, click the variable icon next to the element state selection field, and choose the appropriate variable—this binds the variable. This ensures that the field in the prototype behaves exactly as specified.
For example, to bind a variable to the "Email" field we:
- Select the field.
- In the toolbar, click the variable icon next to the state selection field.
- Choose the appropriate variable to assign it.
This ensures that the field behaves exactly as defined in the prototype.
Step 4: We set up interactive scenarios
We identify the user actions that trigger changes in element states and configure interactions to make the prototype behave like a real application.
For example, here's how the "Sign Up" button works:
- If the email and password fields are empty → a hint appears below them saying "Please fill in the field".
- If the email or password is entered incorrectly → the text changes to "Please enter valid data".
- If all data is correct and the terms are accepted → the button allows proceeding to the next screen.
Note: More complex flows require more complex setups.
Step 5: We test the prototype
We make sure that all actions are performed correctly, variables are updated properly, and conditions trigger as expected.
Examples of using variables in prototyping: A music app case study
To better illustrate the impact of variables on prototyping, let's explore a few practical examples. These demonstrate how variables can create dynamic, realistic prototypes, allowing for interactivity without the need for multiple screens. The music app used in these examples is a hypothetical case designed to illustrate the prototyping capabilities of variables and demonstrate how they can be applied to create more effective prototypes across different types of digital products.
1. Selecting favorite artists for personalized recommendations
The user must select three artists for the app to customize recommendations. The user cannot proceed until all three artists have been selected.
How it works:
- Variables are used to store the selection state of each artist card. When an artist is selected, the state of the card element changes to "selected," and the corresponding variable updates the button text to show how many artists are still to be selected.
- The button becomes active only when all three artists have been selected, after which it changes to "Continue."
- On the next screen, the selected artists are displayed as a result of the bound variables, which pass the selection data to other screens.
2. Dynamic tab navigation
Instead of creating separate screens for each tab, which requires numerous interactions and can complicate navigation, we use variables to dynamically display the relevant content for each tab.
How it works:
- We create components with the corresponding content for each tab: "New Releases," "Library," "Popular," "Recent," and "Radio."
- We add variables that track the selected tab.
- When the user switches to another tab, the variable updates, and the content on the screen changes automatically. Thus, we only need one screen instead of five.
3. Adding a track
In the app, the user can add a song via a link and enter data (such as track title, artist, select genre). To make the process as realistic as possible, we used variables that update the interface in real time.
How it works:
- Initially, when adding a song, the track title is displayed as "Untitled." The user enters the artist's name and the song title, and this data is automatically updated in the interface due to text variables.
- As soon as the user selects a genre, it is also displayed in the interface in real time, thanks to bound variables that transfer the genre selection data.
- After filling in all fields, the 'Save' button becomes active based on the conditions set for it. Clicking the button triggers a popup confirming success (song added) and offers the option to navigate to the library, where the user will see the added song, thanks to the variables that control which content is displayed on the screen.
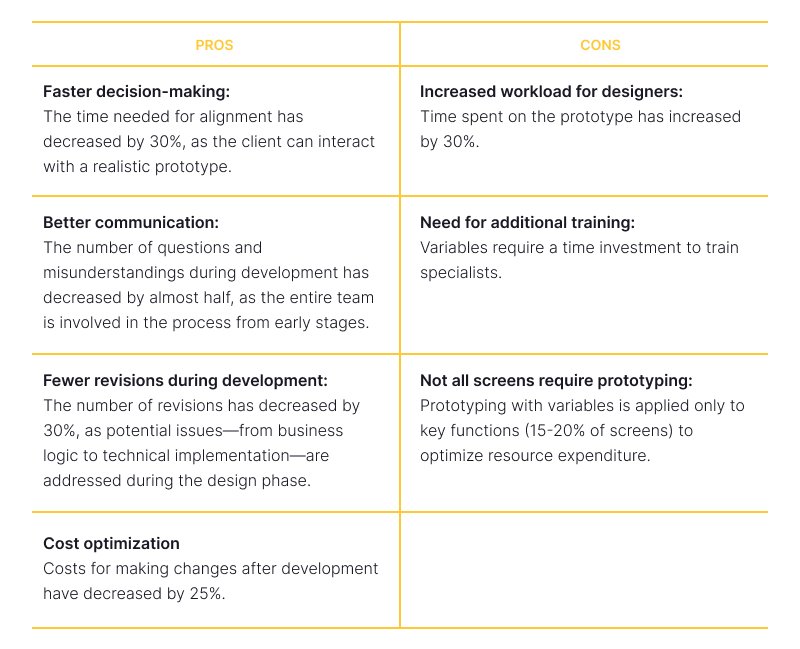
Pros and cons of using variables in prototyping
Prototyping with variables is a powerful tool that offers significant advantages but also presents certain disadvantages. Teams need to assess the feasibility of this approach by considering project specifics, team size, and expected outcomes. We look not only at the design processes but also at how this method affects the overall workflow of the team. It's crucial to ensure the prototype aligns with technical constraints and business goals to meet requirements and ensure feasibility. To evaluate this approach, we compared results from past projects and reviewed internal workflows.
Conclusion
Variables in Figma are not just a convenient tool for designers—they enhance work efficiency, optimize time and budget, and improve client interaction throughout various stages of development. As mentioned earlier, prototypes are not always necessary, but in certain situations, especially with complex projects or rapid changes, prototypes—particularly interactive ones—become indispensable. Here’s why:
- Testing designs with Maze/Miro: Prototypes allow direct testing of ideas through these platforms, providing accurate insights into user behavior and expectations.
- Improving usability testing outcomes: Thanks to interactive prototypes, users can interact with the product more intuitively, leading to more accurate and actionable results from testing.
- Quick approval of ideas: Interactive prototypes open opportunities for presentations and demos to clients, helping visualize concepts and product functionality. For simpler projects with established design processes, prototypes reduce the number of meetings, speeding up approvals and enhancing communication efficiency.
- Understanding complex product functionality: Highly interactive prototypes allow clients, developers, and the team to visually see how complex product functionality will work and identify potential issues early on.
- Minimizing risks: When there are high risks and the cost of errors is significant, prototypes serve as an essential tool for preventing mistakes and saving costs in the later stages of development.
An interactive prototype allows clients to better understand how the final product will look and behave, and make informed decisions before development begins. This not only reduces risks but also speeds up time to market, optimizes costs, and improves communication within the team.
If you need to create an effective and realistic prototype of your digital product, we know how to do it right.